Using a TIG welder may seem daunting at first, but once you grasp the basics, you’ll unlock a world of precision welding possibilities. The key to mastering how to use a TIG welder lies in understanding its components and practicing proper technique. In this guide, we will walk you through the essential steps to set up and operate a TIG welder like a pro. Let’s dive in and discover the art of TIG welding together.

How to Use a TIG Welder: A Beginner’s Guide
Are you ready to dive into the fascinating world of welding? Using a TIG (Tungsten Inert Gas) welder may seem intimidating at first, but with the right guidance, you can master this essential skill. In this comprehensive guide, we will walk you through the basics of how to use a TIG welder, step by step. From setting up your equipment to creating beautiful welds, we’ve got you covered!
Getting Started: Understanding Your TIG Welder
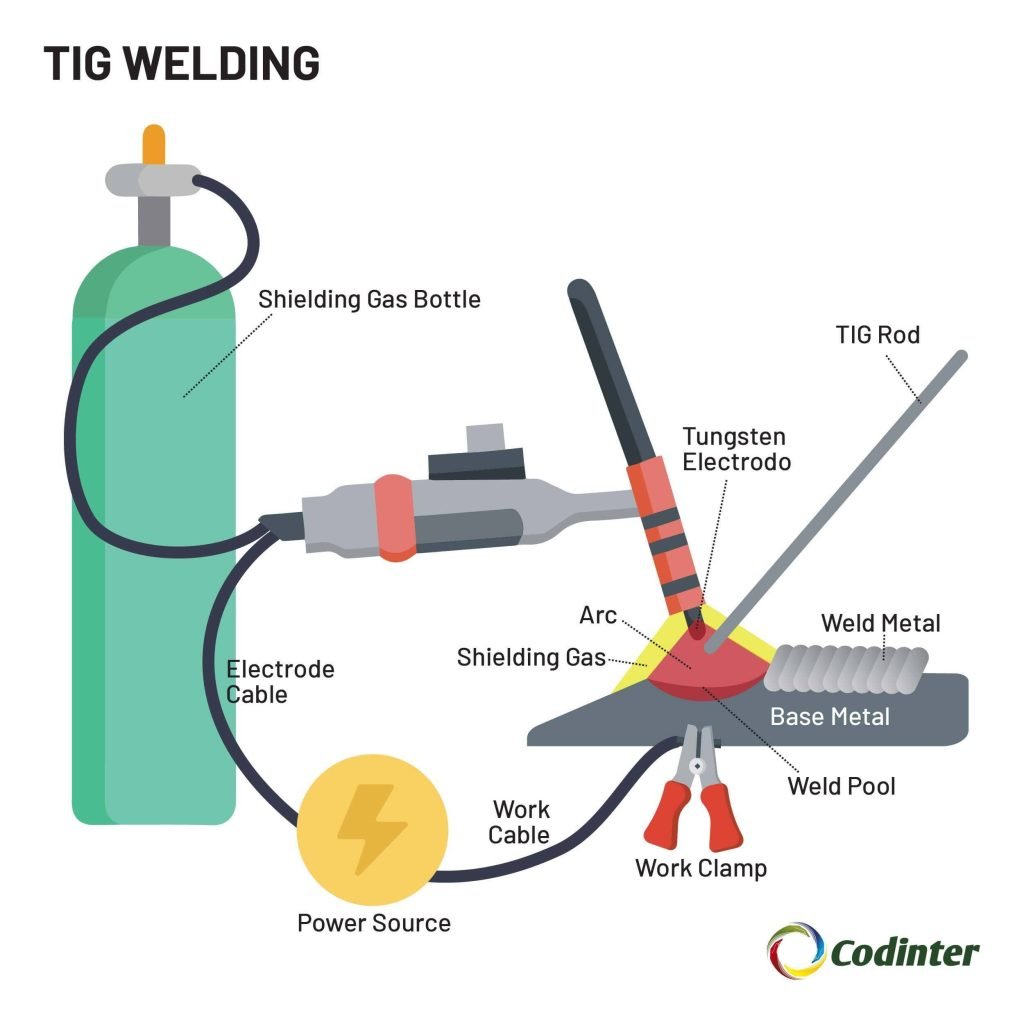
Before you start welding, it’s crucial to familiarize yourself with the components of a TIG welder. A TIG welder consists of a power source, a welding torch, a shielding gas supply, and a ground clamp. The welding torch holds the tungsten electrode, which generates the arc used to weld metals together.
Setting Up Your Workspace
Creating a suitable workspace is key to successful welding. Ensure your work area is well-ventilated and free of flammable materials. Position your TIG welder on a stable surface, and make sure all cables are properly connected.
Preparing Your Materials
Before you start welding, it’s essential to prepare your materials. Clean the metal surfaces you plan to weld to remove any rust, dirt, or debris. Properly aligned and clean materials are essential for strong, high-quality welds.
Setting Up Your TIG Welder
Now that you’ve prepared your workspace and materials, it’s time to set up your TIG welder.
Adjusting the Amperage
The amperage setting on your TIG welder determines the intensity of the arc. Start with a lower amperage for thinner materials and increase it gradually as needed.
Selecting the Right Tungsten Electrode
Choosing the correct tungsten electrode is crucial for successful welding. Different materials require specific types of electrodes, so be sure to select the appropriate one for your project.
Welding Techniques
Once your TIG welder is set up, it’s time to start welding!
Establishing the Arc
To create a welding arc, gently tap the tungsten electrode on the metal surface and slowly withdraw it. This action initiates the arc, which will melt the metal and create a bond.
Controlling the Welding Pool
As you weld, focus on controlling the size and shape of the welding pool. Move the torch in a smooth, steady motion to create a consistent weld bead.
Adding Filler Rods
For thicker materials or gaps between metal pieces, you may need to use filler rods. Dip the filler rod into the welding pool and move it along the seam to add extra material.
Finishing Touches
After you’ve completed your weld, it’s essential to properly finish the job.
Cleaning the Weld
Remove any slag or spatter from the welded area using a wire brush. A clean weld not only looks better but also ensures maximum strength.
Inspecting Your Weld
Once your weld has cooled, inspect it for any defects or imperfections. A quality weld should be smooth, uniform, and free of cracks or discontinuities.
Practice Makes Perfect
Remember, mastering TIG welding takes time and practice. Don’t get discouraged if your first welds aren’t perfect. With dedication and perseverance, you’ll improve your skills and create beautiful, strong welds.
In conclusion, learning how to use a TIG welder is a valuable skill that opens up a world of possibilities in metalworking. By following the steps outlined in this guide and practicing regularly, you can become a proficient TIG welder in no time. So, roll up your sleeves, put on your safety gear, and start welding!
Learning how to TIG weld made easy
Frequently Asked Questions
How do I set up a TIG welder for use?
To set up a TIG welder, start by choosing the appropriate type of tungsten electrode based on the material you are welding. Next, install the electrode securely in the torch and set the correct amperage on the machine. Ensure the gas flow rate and shielding gas type are suitable for your welding project. Finally, adjust the balance control and high-frequency settings as needed before starting to weld.
What safety precautions should I take when using a TIG welder?
When using a TIG welder, always wear proper welding gear, including a welding helmet, gloves, and flame-resistant clothing. Ensure your work area is well-ventilated to prevent exposure to harmful fumes. Keep a fire extinguisher nearby and be cautious of electrical hazards. Additionally, never touch the electrode or metal parts of the torch during or immediately after welding to avoid burns.
How can I achieve a strong and clean TIG weld?
To achieve strong and clean TIG welds, practice proper technique by maintaining a steady hand and consistent travel speed. Ensure that the electrode tip is sharp and clean to create a focused arc. Take your time to fuse the base metals together smoothly without excessive weaving or hesitation. Proper fit-up of the pieces to be welded also contributes to the quality of the weld.
Final Thoughts
In conclusion, using a TIG welder effectively requires mastering key techniques such as maintaining a consistent arc length, controlling the heat input, and choosing the right filler metal. Practice is essential to improve your TIG welding skills and achieve high-quality welds. Remember to clean the workpiece thoroughly before starting, and always wear proper safety gear. With practice and attention to detail, you can become proficient in using a TIG welder to create strong and precise welds.