Want to learn how to draw a teddy bear step by step? Follow along as we unravel the secrets behind capturing the charm of these cuddly creatures on paper. With simple instructions and helpful tips, creating your very own adorable teddy bear masterpiece is just a few strokes away. Let’s dive into the world of art and unleash your creativity as we guide you through the process of bringing a lovable teddy bear to life through the magic of drawing. Get ready to embark on a delightful artistic journey!

How to Draw a Teddy Bear Step by Step
Welcome to this fun and informative guide on how to draw a teddy bear step by step! Whether you’re a beginner or an experienced artist, this tutorial will help you create your very own adorable teddy bear drawing. Grab your drawing supplies and let’s get started!
Materials You’ll Need:
Before we begin drawing our teddy bear, let’s make sure you have all the necessary materials. You will need:
- Sketching paper
- Pencil
- Eraser
- Colored pencils or markers (optional)
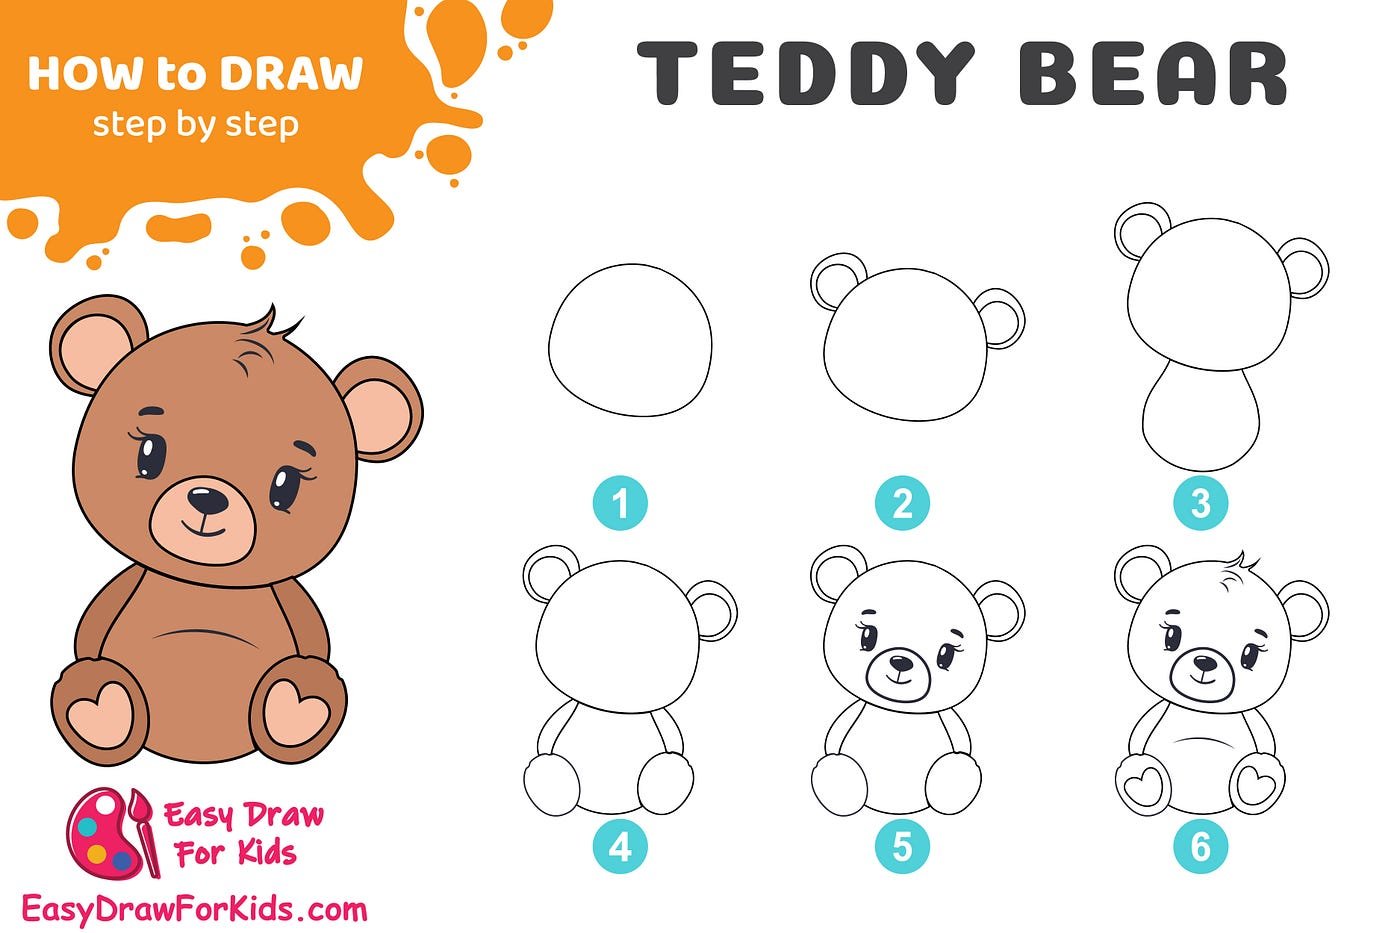
Step 1: Draw the Teddy Bear’s Head
Start by drawing a large oval shape for the teddy bear’s head. Remember, teddy bears have round and cuddly faces, so make sure your oval is nice and soft.
Tips:
- Use light, gentle strokes with your pencil so you can easily erase any mistakes.
- Don’t worry about making it perfect on the first try; drawing is all about practice!
Step 2: Add the Ears and Eyes
Next, draw two small circles on top of the head for the teddy bear’s ears. Then, add two medium-sized circles for the eyes inside the head oval. You can also add a small triangle for the teddy bear’s nose.
Tips:
- Position the ears evenly on both sides of the head.
- For the eyes, leave some space between them to make the teddy bear look cuter.
Step 3: Draw the Body and Arms
Now, draw a big oval shape below the head for the teddy bear’s body. Add two small ovals on each side of the body for the arms. Your teddy bear is starting to take shape!
Tips:
- Keep the body proportions in mind; teddy bears have short and chubby arms.
- Connect the arms to the body smoothly to create a seamless look.
Step 4: Create the Legs and Feet
Draw two short lines below the body for the teddy bear’s legs. Then, add small ovals at the end of each line for the feet. Your teddy bear should now have a complete body!
Tips:
- Make the legs slightly curved to give your teddy bear a playful stance.
- Add small details like toes on the feet to make the drawing more realistic.
Step 5: Add Fur and Details
This is the fun part! Use your pencil to add short, curved lines all over the teddy bear’s body to create a furry texture. You can also add a smile under the nose and small circles for cheeks.
Tips:
- Experiment with different pencil pressures to vary the fur texture.
- Feel free to get creative with your teddy bear’s expression and accessories!
Step 6: Color Your Teddy Bear (Optional)
If you want to give your teddy bear some color, grab your colored pencils or markers and start coloring! Choose soft browns, greys, or even pastel colors to bring your teddy bear to life.
Tips:
- Start by lightly coloring the entire teddy bear, then gradually add darker shades for shading.
- Blend different colors together to create a more realistic fur effect.
Congratulations on creating your very own teddy bear drawing! Drawing is a wonderful way to express your creativity and imagination. Keep practicing, and soon you’ll be able to draw all kinds of cute characters. We hope you enjoyed this step-by-step guide on how to draw a teddy bear!
Remember, the most important thing is to have fun while drawing. Happy sketching!
How To Draw A Teddy Bear – US National Teddy Bear Day
Frequently Asked Questions
What materials do I need to draw a teddy bear step by step?
To draw a teddy bear step by step, you will need a pencil, eraser, paper, and colored pencils or markers for coloring. These basic supplies will help you achieve a cute and detailed teddy bear drawing.
How can I start drawing a teddy bear’s body?
Begin by sketching a large oval for the teddy bear’s body. Then, add smaller ovals for the head, arms, and legs. Make sure to keep your lines light and easy to erase as you refine the shape and proportions.
What are some tips for drawing a teddy bear’s face?
When drawing a teddy bear’s face, start with two small circles for the eyes and a larger oval for the nose. Add a small smile underneath the nose to give your teddy bear a friendly expression. Don’t forget to draw cute little ears on top of the head.
How do I add details to make my teddy bear drawing more realistic?
To make your teddy bear drawing more realistic, add fur texture by drawing short, curved lines all over the body. You can also add a belly button, paw pads, and a ribbon around the bear’s neck for extra charm and detail.
Final Thoughts
In conclusion, learning how to draw a teddy bear step by step can be a fun and rewarding experience. Starting with basic shapes and gradually adding details like ears and facial features can help you create a cute and cuddly teddy bear illustration. Remember to practice regularly and not be afraid to make mistakes. With patience and determination, anyone can master the art of drawing a teddy bear step by step. Enjoy the process and let your creativity shine through in each stroke of the pencil.